Use AgencyZoom tags in RiskAdvisor
This article explains how to configure automatic AgencyZoom tags and let your team choose additional tags on individual RiskProfiles before sending them to AgencyZoom. Intended for agency owners, admins, and agents using the AgencyZoom integration.
Written By David Watson
Last updated 3 months ago
Overview
RiskAdvisor supports two types of AgencyZoom tags:
Automatic tags your team configures once and sends based on fixed rules
Selectable tags your admins make available so agents can choose them per RiskProfile before sending to AgencyZoom
This gives your team more control over how leads are labeled in AgencyZoom without using Zapier or extra setup outside the integration.
Before you begin
Make sure all of the following are true before setting up tags:
Your team has the AgencyZoom integration connected
You are an Account Owner or Admin if you need to configure which tags are available
The tags you want to use already exist in AgencyZoom
Agents sending RiskProfiles to AgencyZoom have the integration available on the Review & Send step
📝 Note: If you add a new tag in AgencyZoom, you can refresh the tag list in RiskAdvisor to pull it in.
Automatic tags
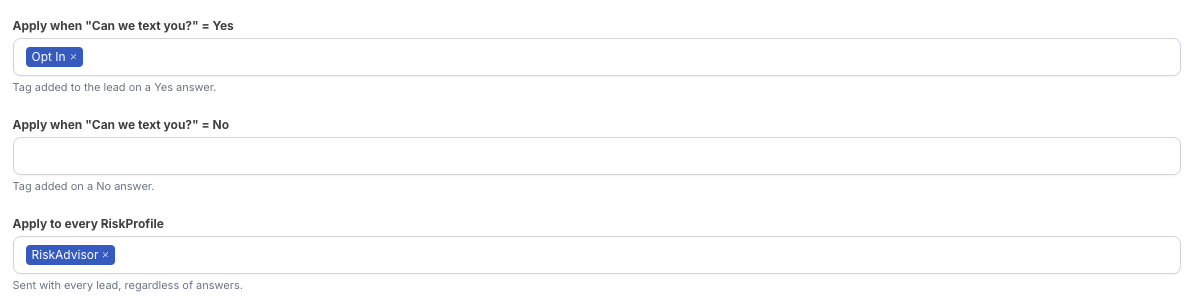
RiskAdvisor supports three automatic tag scenarios:
Apply when "Can we text you?" = Yes
Use this to automatically add a tag when a client or prospect has confirmed that you can text them.
Apply when "Can we text you?" = No
Use this to automatically add a tag when a client or prospect has confirmed that you should not text them.
⚠️ Warning: Make sure your texting workflows also follow TCPA requirements and your agency's compliance process.
Apply to every RiskProfile
Use this to add one or more default tags to every lead sent from RiskAdvisor to AgencyZoom.
This is helpful when you want all RiskAdvisor-created leads to carry a consistent source or workflow tag.
Make tags available for your team to use
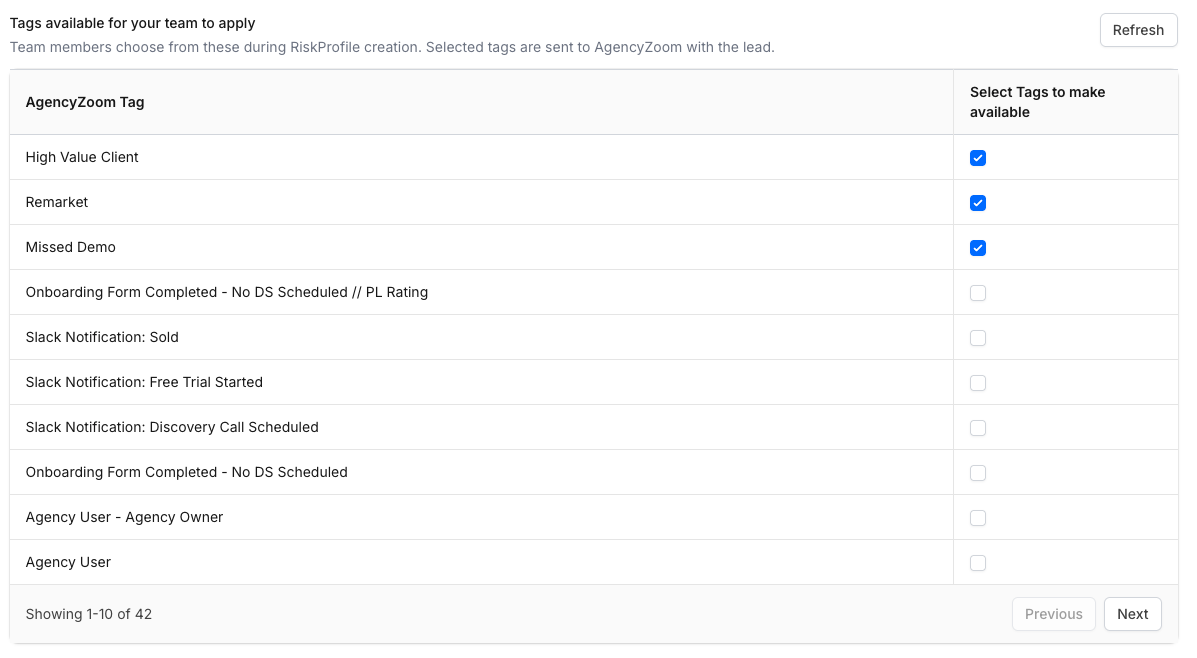
Admins can choose which existing AgencyZoom tags agents are allowed to apply on individual RiskProfiles.
How to set up Selectable Tags
Open Team Settings.
Open Integrations.
Open AgencyZoom Tags.
Review the section labeled Tags available for your team to apply.
Select the AgencyZoom tags you want agents to be able to use.
Click Save.
After saving, those tags become available to your team when they send a RiskProfile to AgencyZoom.
💡 Tip: Keep this list focused on tags your team actually uses. A smaller curated list is easier for agents to use consistently.
Refresh the tag list from AgencyZoom
If you recently created new tags in AgencyZoom:
Open AgencyZoom Tags.
Click Refresh.
Wait for RiskAdvisor to reload the available tag list.
Select any newly imported tags you want to make available.
Click Save.
RiskAdvisor only shows the tags your admins choose to make available to the team.
Apply tags to a RiskProfile before sending
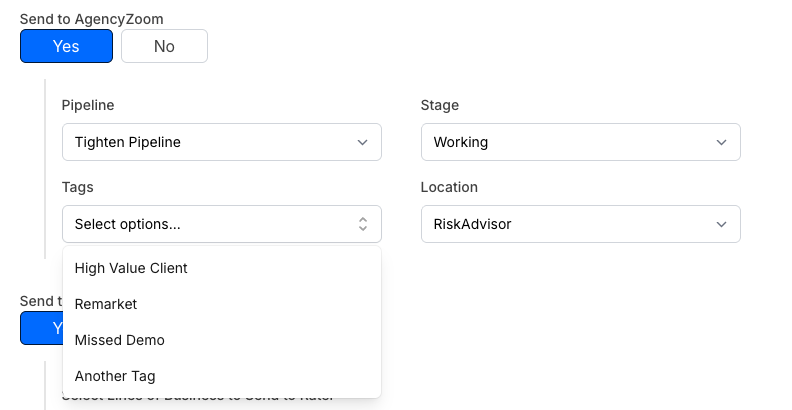
Once admins have made tags available, agents can apply them when sending a RiskProfile to AgencyZoom.
Steps
Open a new or existing RiskProfile.
Go to the Review & Send step.
In the Send to AgencyZoom section, open Tags.
Select one or more tags from the list.
Complete the rest of your AgencyZoom send settings as needed.
Send the RiskProfile to AgencyZoom.
RiskAdvisor sends the selected tags along with any automatic team tags already configured.
What happens next
When the RiskProfile is sent:
The lead is created or updated in AgencyZoom
Any automatic tags configured by your team are included
Any agent-selected tags from the RiskProfile are included too
This helps agencies trigger lifecycle automations, reporting, and follow-up workflows directly from AgencyZoom.
Troubleshooting
I don't see the Tags option on the RiskProfile
I don't see the Tags option on the RiskProfile
Check the following:
Your admin has selected at least one tag in Tags available for your team to apply
Your team's AgencyZoom integration is connected correctly
You are on the Review & Send step
Send to AgencyZoom is enabled for that RiskProfile flow
I added a tag in AgencyZoom, but it doesn't appear in RiskAdvisor
I added a tag in AgencyZoom, but it doesn't appear in RiskAdvisor
Click Refresh on the AgencyZoom Tags settings page, then save after selecting the new tag.
The wrong tags were sent to AgencyZoom
The wrong tags were sent to AgencyZoom
Review both places tags can come from:
Team-level automatic tags
Tags selected on the individual RiskProfile before send
If both are configured, both sets may be sent together.
Still need help? Ask the team